Pages

Tuesday, June 25, 2013

The Cute Veggies

I love checking out all of the different varieties of produce at the market.  Every week, I'm guaranteed to see something that I haven't seen before.  I have noticed that I seemed to be drawn towards the "cute" vegetables.  There is something about mini versions of veggies that attracts me.  Just an FYI...mini versions of broccoli and cauliflower taste exactly the same...maybe not worth the premium price.  But they were fun!

This week I found these great summer squash.  The green ones are called starships and the yellow one is a flying saucer.  I'll probably just slice them up and grill them with a bit of olive oil.


I also decided to try some lemon cucumbers.  They don't really taste different from your standard varieties.  Their name only refers to the shape...they really do resemble lemons.  Here they are with a few heirloom tomatoes.
 

I decided to make a quick Mediterranean-style salad.  So easy.  It can be thrown together in just a few minutes.

Salad:
2 lemon cucumbers
3 small tomatoes
about 1/2 cup each red onion and yellow pepper
2 oz feta

Dressing:
2 tbsp. red wine vinegar
1/2 tbsp. lemon juice
1 clove garlic, minced
1 tsp. dried oregano
3 tbsp. olive oil
salt and pepper

Instructions:
Chop all the vegetables into similar sized pieces and combine them in a bowl. 
In a small bowl, whisk together all dressing ingredients.  Toss the vegetables with the dressing and then crumble the feta on the top.  Best if you can let the flavors come together for at least 30 minutes before serving.

Thursday, June 20, 2013

Fabulous Favas

The last few weeks there have been a number of vendors at the farmers market with fava beans.  They really are big ugly-looking beans, but I decided to make them my new-food-of-the week.  Another round of Googling to figure out what to do with them.  And I had no idea how much work they were!

I'm going to share with you what I think is the ultimate springtime salad.  It is so green!  Favas and peas are at peak season right now and easy to find.  I had to search all over for the asparagus.  Definitely past the peak for the local farmers market, and my usual grocery store only sells Mexican asparagus (How sad is that?  California has the best produce in the US!)  Anyways...Whole Foods to the rescue...and don't even ask how much I spent on it...but at least it was from California!

First, here is the list of ingredients.  I found the recipe on bonappetit.com

Pea, Asparagus, and Fava Bean Salad

1 1/2 tbsp. olive oil
1/2 tbsp. Parmesan
1/2 tbsp. lemon juice
salt and pepper
1 cup fresh fava beans
1 bunch asparagus, trimmed
1/2 cup shelled fresh peas
1/3 cup red onion
2 slices bacon, cooked and crumbled

Instructions:
Shell the fava beans.  Here are my before and after shots.

Then do the same for the English Peas.  I really had to try hard not to eat them all as I was shelling them.  I love them!  I only had one or two...OK...maybe a few more...

Cook the favas in boiling water until they are tender, for about 4 minutes.  Drain and transfer them to a bowl of ice water to stop the cooking process.


Then, do the same for the peas, but they only need to be cooked for 2 minutes.
Here are my peas taking an icy cold bath.


Instead of boiling the asparagus, I decided to steam them.  It only takes about 3 minutes because you want them to be just tender.  Drop them into an ice bath as well.

So this was the part I didn't know about fava beans - you have to peel them again!  Now there are people online who claim you don't have to, and of course you don't, it's perfectly fine to eat them as is, but the texture seems a bit tough to me.  I set out to peel them all again.  I think I peeled about 3 or 4 and then decided that I needed some help...


I was happy I only had a cup of beans to peel.  In the end, I had a small amount of very tender, bright green beans.


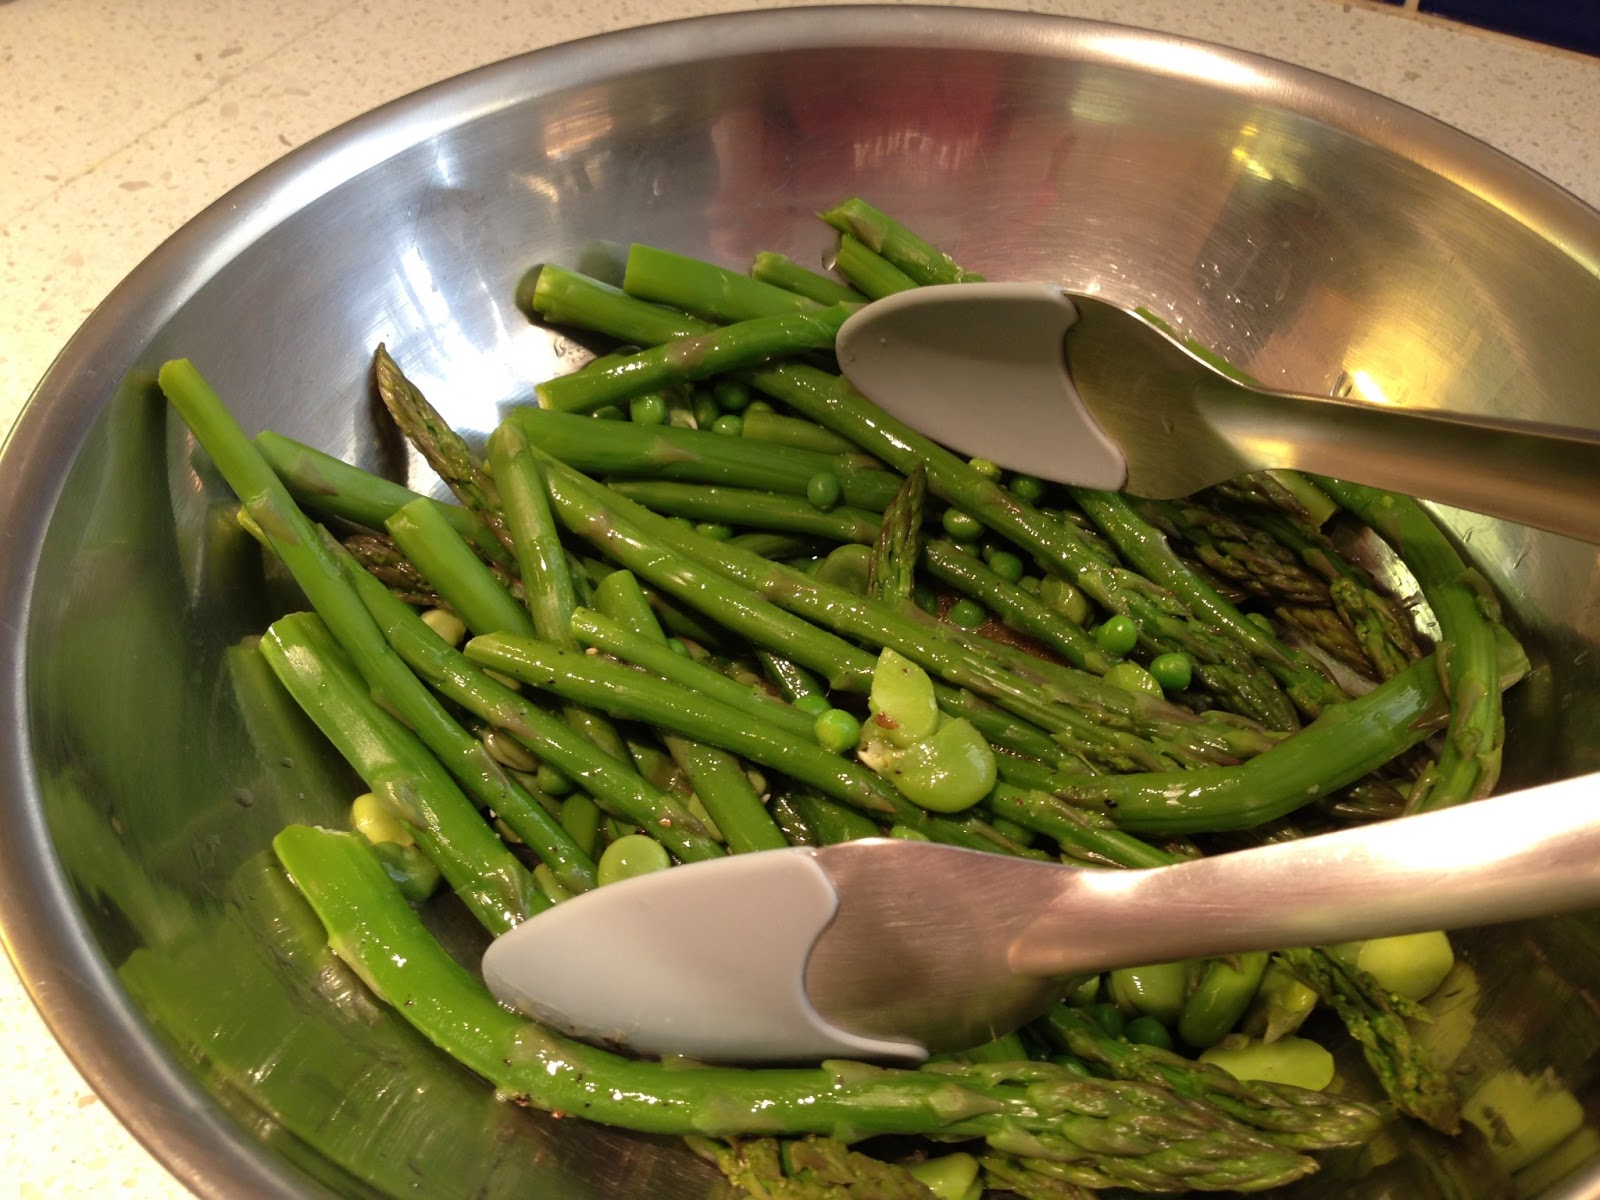
Next sauté the onion and the bacon.  Then make the salad dressing (olive oil, parmesan, lemon juice, salt and pepper).


Combine all vegetables in a large bowl and mix in bacon and onion.  Add dressing and toss to coat.  Season with additional salt and pepper to taste.


And here is the final salad.  Of course, I added a bit more Parmesan.  Tastes great!  Favas are on my shopping list again next week.


Tuesday, June 11, 2013

Baby Artichokes

My favorite place in all of San Francisco is the farmers market at the Ferry Building (I think that officially makes me a food geek).  It offers up such a wide range of produce and many varieties of fruits and veggies that I have not even seen before.  Why buy a regular zucchini when you can buy some crazy multi-colored striped one?  I have decided that every week I am going to try to buy at least one item that is new to me or that I very rarely eat.  This week = baby artichokes.

Confession...I have never cooked artichokes before...no idea what to do with them.  I've only ever had the jarred variety on pizza or that creamy artichoke dip.  The big softball sized globe artichokes in the stores always were a bit intimidating to me, but I decided that I could probably handle the babies!

So, here are my 6 little artichokes.  Yes, only 6.  I wasn't sure how this experiment was going to turn out...

After much Google searching, not only did I find out that artichokes are a part of the thistle family, and are a good source of folate, magnesium and vitamin K too, did I realize that these babies are definitely the way to go when it come to prep.  You don't have to deal with removing the inedible fuzzy choke because it hasn't fully developed yet.

I can't give specific credit to anyone for this recipe.  I probably looked at 25 different recipes and how-to pages for cooking artichokes, then combined my favorite parts of all of them to come up with this one.

Sautéed Baby Artichokes

6 baby artichokes
1 lemon
1 clove garlic
1 tbsp. olive oil
1 tomato, chopped
1 tbsp. red wine vinegar
salt and pepper
parmesan cheese

Instructions:
The first step is to fill a bowl with cold water.  Squeeze in the juice of half a lemon.  Artichokes start to turn brown very quickly so you want to toss them in the acidified water as soon as you begin peeling them.

Wash the artichokes.  Start peeling back the outer dark leaves until you get to the smooth pale green leaves.  It feels like you are throwing away most of the artichoke, but you really just want to eat the tender inner leaves.


Then chop off the top 1/2 inch or so.


Trim off the stem, cut in half and toss into the lemon-water.  I didn't see a choke on most of the artichokes I was using.  I had one that was slightly larger, so I scooped out some very fine fuzzy hairs out of the center.  I'm thinking it probably didn't matter because they were so small.


 Heat 1 tbsp. of olive oil over medium-high heat.  Drain the artichokes, pat them dry on some paper towel and add them to the pan.  Sauté for 2 minutes before adding the garlic and then sauté for another 1-2 minutes.


Then I added in the chicken broth, chopped tomato, red wine vinegar and salt and pepper.  I reduced the heat to medium-low and let it simmer for about 10 minutes.  Then I squeezed in the juice from the remaining lemon half and let it cook for another couple of minutes.


I finished it off with some freshly grated parmesan.


This made the tiniest amount... but ok for just the two of us.  Great new side dish!  It didn't take as long to prepare as I thought it might, but I think it is well worth the time.  I'm still not sure if I'm ready to tackle the large artichokes yet, but I am going to go searching for more babies next week before the season is over.

Monday, June 10, 2013

Empanada Party

Yesterday I had the opportunity to learn a little more about South American cooking with one of my Meetup groups.  Our gracious hostess Geraldine held a cooking party in her home, and gave us a hands-on lesson about making Argentinian empanadas.

I was a bit disappointed that we were not going to do the traditional beef/egg/olive filling (she thought it would be best to stick with something vegetarian to appeal to everyone), but they were still delicious.

I was happy to find out that many people will purchase the empanada wrappers already made (I am a terrible dough-maker!) as this will make it so much easier to try to make them on my own.  This is Geraldine's favourite because it comes frozen and it designed specifically for baking (Horno) vs. frying.

We made two different fillings for our empanadas.  The first was blue cheese.  We mixed together equal parts of finely mashed blue cheese (about 8oz) and diced mozzarella.


Then mixed in about 4 tbsp. each of finely chopped walnuts and celery along with some salt and pepper.

Our second filling was made up of approximately equal amounts of diced tomatoes (seeded) and mozzarella.  We added in some chopped fresh basil, salt, pepper, and a couple of tbsp. of olive oil and let it all marinade together for about 30 minutes.


Geraldine gave us an expert demo in empanada assembly and then threw us in to try making our own.  You want to add as much filling as you think will fit into it.


Then rub water on the outer edges so that they will stick together.

Then seal it up and fold the edges of the dough over on itself to make the repulgue.  The nicely crimped edge not only looks good but holds everything in place.


Poke holes so that it doesn't explode in the oven and then brush a wash of egg yolk on the top so it will get golden brown when it cooks.
 
 
And here is the finished product! 

Thanks again to our fabulous teacher Geraldine!
Now I'm ready to try this at home.


Tuesday, June 4, 2013

Red, Red...Rhubarb

One of my favorite springtime foods is rhubarb.  I know that you can buy it frozen year-round, but that just doesn't work for me.  I think the fact that it is only available for a short time makes it special, and I can't wait for that first taste of the season. 
We always had lots of it around when I was a kid - I think every farm in rural Ontario has a patch of it growing out back somewhere.  We had armfuls of it.  I even tried planting some of my own in my Toronto backyard.  We moved before the plant really had a chance to get established...I hope the new owners appreciate it!

So when I spotted some at the farmers market I was thrilled.  I love it any way that it is prepared...a simple compote, muffins, cakes, and of course, in a pie.  I am a terrible pie-maker.  Pastry is just not my thing...so that was out.  I have the best memories of my grandma's rhubarb cakes.  They were perfectly moist, but with a crunchy streusel topping.  I have tried to replicate it but have never been able to get it right.  So...I decided to stick with what I do best...the perfect spring dessert...a strawberry rhubarb crisp.

I saw a recipe online from the NY Times that included orange juice and zest in their rhubarb crisp, so I decided to try it in my version this time.


I used organic strawberries for this.  I personally don't always buy organic, but strawberries are one to consider.  They are #2 on the dirty dozen list for highest levels of pesticide residue.  See the whole list here: http://www.ewg.org/foodnews

First, I chopped up my rhubarb and my strawberries - try to make them about the same size.  Some people peel the rhubarb, and some don't.  I try not to because a) I'm too lazy and b) you end up peeling off all of that great red color.  If the stalks are a bit older or the skin is thicker, then sometimes it is better to peel a bit off.
 

Ok...so before we look at the crumbs...this is not exactly a low-fat recipe...it has almost a whole stick of butter!  I usually make mine with a much higher ratio of oats than other recipes I've seen.  That's just the way I like it.  I just get in there with my hands to mix the butter into the crumb ingredients - it's messy but works the best.


Strawberry Rhubarb Crisp
4 cups chopped rhubarb
2 cups chopped strawberries
1/4 cup sugar
1 tbsp. orange juice
1 tsp orange zest

3/4 cup brown sugar
1/2 cup flour
1 cup rolled oats
1/2 tsp cinnamon
1/4 tsp nutmeg
7 tbsp. cold butter

Preheat oven to 375.  Grease 9 inch square baking dish with butter.

Mix fruit together with sugar, orange juice and zest.  Spoon into baking dish.

Mix together dry ingredients and then work butter into the mixture until it is well incorporated and large crumbs are formed.  Spoon this on top of the fruit mixture in the baking dish.

Bake for 45 mins.  Serves 6-8.


And here is what Mike and I had for dessert!  I definitely liked the addition of the orange juice and zest.  I might even add a little more next time.